Python網(wǎng)絡(luò)編程之ZeroMQ知識總結(jié)
總結(jié)以下:ØMQ (ZeroMQ) 是一個基于消息隊列的多線程網(wǎng)絡(luò)庫,它封裝了網(wǎng)絡(luò)通信、消息隊列、線程調(diào)度等功能,向上層提供簡潔的API,應(yīng)用程序通過加載庫文件,調(diào)用API函數(shù)來實(shí)現(xiàn)高性能網(wǎng)絡(luò)通信。
看起來有些抽象,下面我們結(jié)合ZeroMQ 的 Python 封裝———— pyzmp,用實(shí)例看一下ZeroMQ的三種最基本的工作模式。
二、安裝安裝方法
pip install pyzmq
查看是否安裝成功
>>> import zmq>>> print(zmq.__version__)22.0.3三、Request-Reply (請求響應(yīng)模式)3.1 Request-Reply模式概述: 消息雙向的,有來有往。 Client請求的消息,Server必須答復(fù)給Client。 Client在請求后,Server必須回響應(yīng),注意:Server不返回響應(yīng)會報錯。 Server和Client都可以是1:N的模型。通常把1認(rèn)為是Server,N認(rèn)為是Client。 更底層的端點(diǎn)地址是對上層隱藏的,每個請求都隱含回應(yīng)地址,而應(yīng)用則不關(guān)心它。 ZMQ 可以很好的支持路由功能(實(shí)現(xiàn)路由功能的組件叫做 Device),把 1:N 擴(kuò)展為 N:M(只需要加入若干路由節(jié)點(diǎn))。

#client.pyimport zmqcontext = zmq.Context()# Socket to talk to serverprint('Connecting to hello world server…')socket = context.socket(zmq.REQ)socket.connect('tcp://localhost:5555')socket.send(b'Hello')# Get the reply.message = socket.recv()print(f'Received reply [ {message} ]')3.3 Server端python實(shí)現(xiàn)
#server.pyimport timeimport zmqcontext = zmq.Context()socket = context.socket(zmq.REP)socket.bind('tcp://*:5555')while True: # Wait for next request from client message = socket.recv() print('Received request: %s' % message) # Do some ’work’ time.sleep(1) # Send reply back to client socket.send(b'World') 啟動client.py 首先會打印Connecting to hello world server… 但不會受到任何消息。 然后啟動server.py ,客戶端收到來自客戶端的request: b’Hello’ 此時client端收到來自server端的 reply: [ b’World’ ]
python client.py Connecting to hello world server…Received reply [ b’World’ ]
python server.py Received request: b’Hello’
可以試一下,多運(yùn)行幾個client.py,看看情況是什么樣的。

這里直接引用官方文檔的例子:
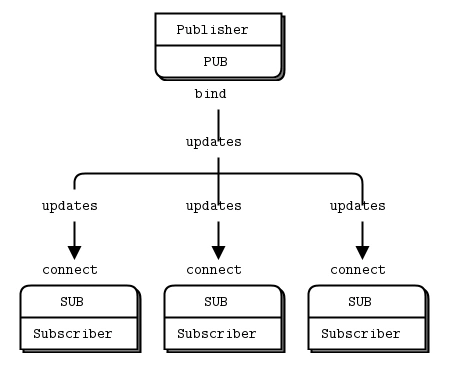
發(fā)布者:類似于一個天氣更新服務(wù)器,向訂閱者發(fā)送天氣更新,內(nèi)容包括郵政編碼、溫度、濕度等信息
#Publisher.pyimport zmqfrom random import randrangecontext = zmq.Context()socket = context.socket(zmq.PUB)socket.bind('tcp://*:5556')while True: zipcode = randrange(1, 100000) temperature = randrange(-80, 135) relhumidity = randrange(10, 60) socket.send_string('%i %i %i' % (zipcode, temperature, relhumidity))
訂閱者:它監(jiān)聽發(fā)布者更新的數(shù)據(jù)流,過濾只接收與特定郵政編碼相關(guān)的天氣信息,默認(rèn)接收接收10條數(shù)據(jù)
#Subscribe.py import sysimport zmq# Socket to talk to servercontext = zmq.Context()socket = context.socket(zmq.SUB)print('Collecting updates from weather server...')socket.connect('tcp://localhost:5556')# Subscribe to zipcode, default is NYC, 10001zip_filter = sys.argv[1] if len(sys.argv) > 1 else '10001'# Python 2 - ascii bytes to unicode strif isinstance(zip_filter, bytes): zip_filter = zip_filter.decode(’ascii’)socket.setsockopt_string(zmq.SUBSCRIBE, zip_filter)# Process 5 updatestotal_temp = 0for update_nbr in range(5): string = socket.recv_string() zipcode, temperature, relhumidity = string.split() total_temp += int(temperature)print( 'Average temperature for zipcode ’%s’ was %dF' % (zip_filter, total_temp / (update_nbr + 1)))

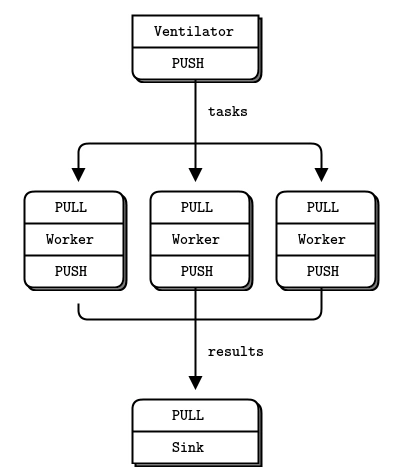
ventilator 使用的是 SOCKET_PUSH,將任務(wù)分發(fā)到 Worker 節(jié)點(diǎn)上。Worker 節(jié)點(diǎn)上,使用 SOCKET_PULL 從上游接受任務(wù),并使用 SOCKET_PUSH 將結(jié)果匯集到 Sink。值得注意的是,任務(wù)的分發(fā)的時候也同樣有一個負(fù)載均衡的路由功能,worker 可以隨時自由加入,ventilator 可以均衡將任務(wù)分發(fā)出去。
Push/Pull模式還是蠻常用的,這里我們主要測試一下它的負(fù)載均衡。
5.2 Ventilator# ventilator.pyimport zmqimport timecontext = zmq.Context()socket = context.socket(zmq.PUSH)socket.bind('tcp://*:5557')while True: socket.send(b'test') print('已發(fā)送') time.sleep(1)5.3 worker
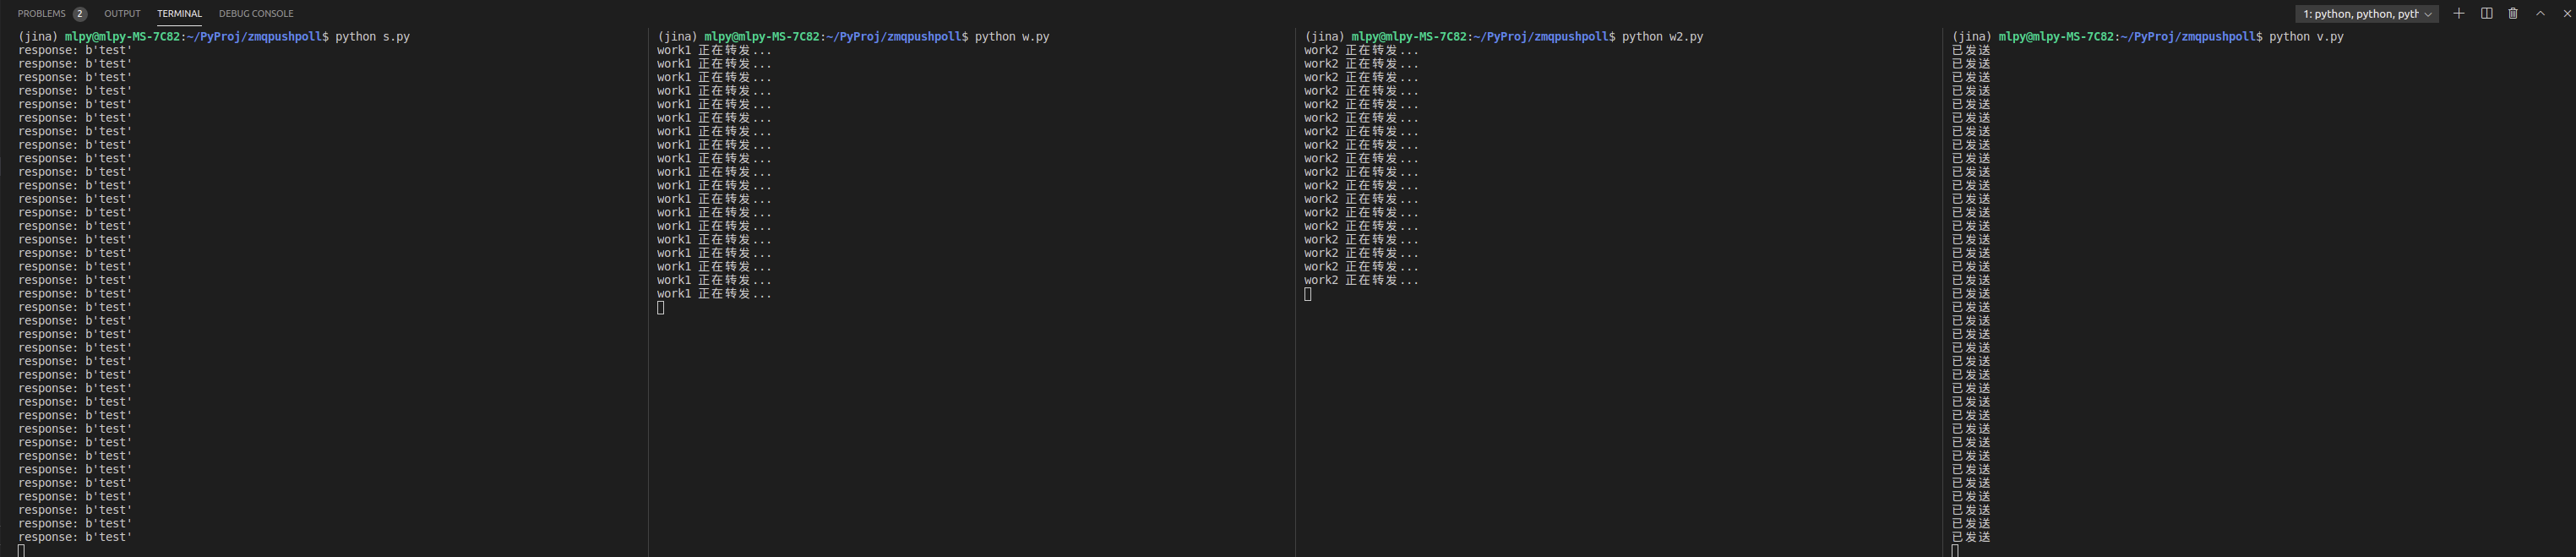
# worker.pyimport zmqcontext = zmq.Context()recive = context.socket(zmq.PULL)recive.connect(’tcp://127.0.0.1:5557’)sender = context.socket(zmq.PUSH)sender.connect(’tcp://127.0.0.1:5558’)while True: data = recive.recv() print('work1 正在轉(zhuǎn)發(fā)...') sender.send(data)5.4 sink
# sink.pyimport zmqimport syscontext = zmq.Context()socket = context.socket(zmq.PULL)socket.bind('tcp://*:5558')while True: response = socket.recv() print('response: %s' % response)
打開4個Terminal,分別運(yùn)行
python sink.pypython worker.pypython worker.pypython ventilator.py
消息模型可以根據(jù)需要組合使用,后續(xù)的代理模式和路由模式等都是在三種基本模式上面的擴(kuò)展或變異。
到此這篇關(guān)于Python網(wǎng)絡(luò)編程之ZeroMQ知識總結(jié)的文章就介紹到這了,更多相關(guān)Python ZeroMQ知識總結(jié)內(nèi)容請搜索好吧啦網(wǎng)以前的文章或繼續(xù)瀏覽下面的相關(guān)文章希望大家以后多多支持好吧啦網(wǎng)!
相關(guān)文章:
1. IntelliJ IDEA設(shè)置默認(rèn)瀏覽器的方法2. idea修改背景顏色樣式的方法3. PHP擴(kuò)展之APC——Alternative PHP Cache(可選PHP緩存)4. bootstrap select2 動態(tài)從后臺Ajax動態(tài)獲取數(shù)據(jù)的代碼5. IntelliJ IDEA安裝插件的方法步驟6. IntelliJ IDEA刪除類的方法步驟7. idea給項目打war包的方法步驟8. idea自定義快捷鍵的方法步驟9. IntelliJ IDEA導(dǎo)出項目的方法10. IntelliJ IDEA設(shè)置自動提示功能快捷鍵的方法
 網(wǎng)公網(wǎng)安備